
Household cleaning checklist for crystal chandeliers 2026
Many homeowners unknowingly damage their crystal chandeliers while trying to clean them. Using harsh chemicals, improper techniques, or skipping safety steps can permanently dull crystals or corrode metal finishes. This comprehensive checklist provides expert-backed, environmentally friendly cleaning methods specifically designed for 2026 homeowners who want to preserve their chandelier’s brilliance. You will learn how to prepare your workspace safely, select the right pH-neutral cleaners, follow a methodical step-by-step process, and maintain your fixture’s elegance without professional help. Whether you own a modern fixture or an antique heirloom, these proven techniques protect your investment while delivering sparkling results.
Key takeaways
| Point | Details |
|---|---|
| Safety first | Always turn off power at the circuit breaker and use proper protective equipment before starting any chandelier cleaning. |
| Choose gentle cleaners | pH-neutral, non-abrasive products preserve crystal clarity and prevent metal finish damage. |
| Use spray and drip method | This no-wipe technique removes grime effectively while minimizing crystal handling and breakage risk. |
| Establish regular schedule | Light dusting every 2-3 months and full cleaning every 6-12 months maintains optimal brilliance. |
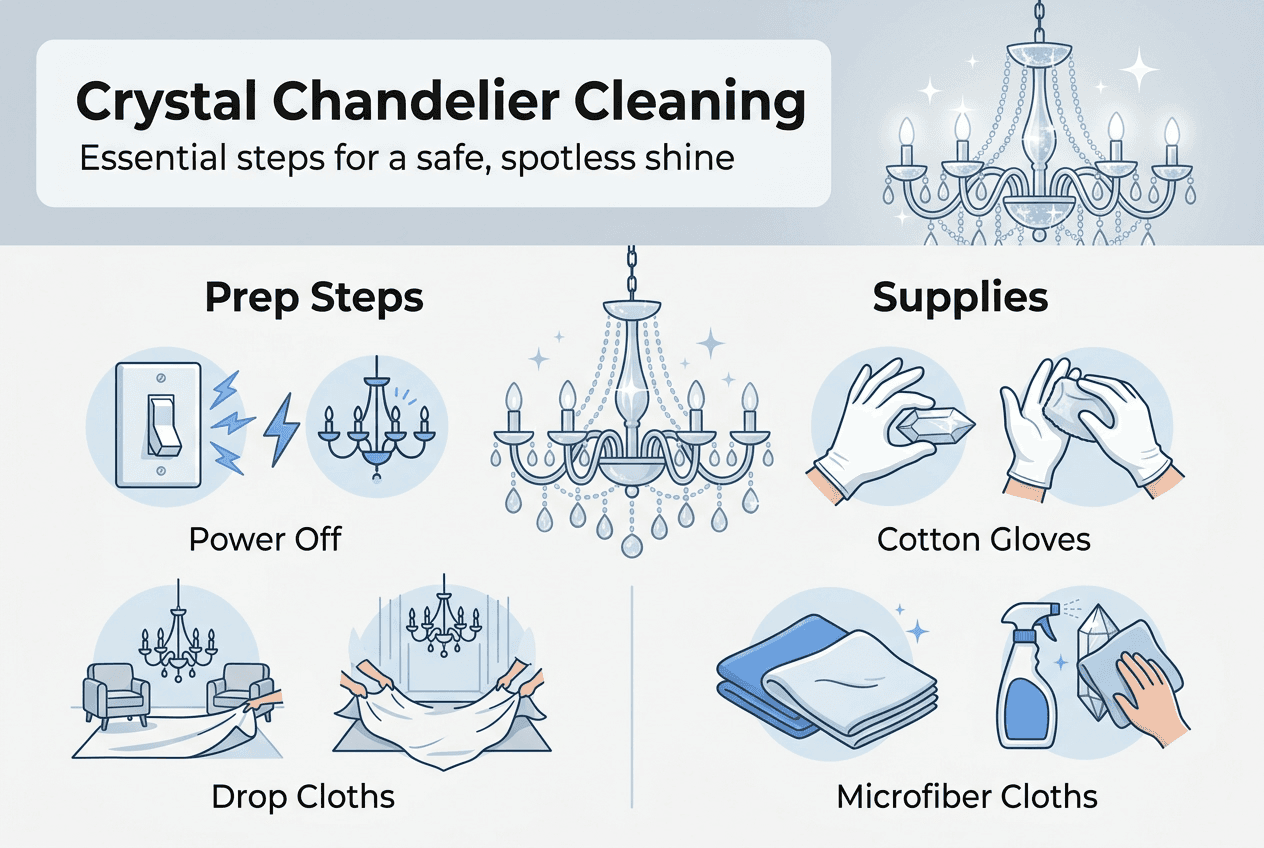
| Protect your workspace | Drop cloths, painter’s tape, and adequate lighting create a safe, efficient cleaning environment. |
Preparing your workspace for chandelier cleaning
Proper preparation prevents accidents and protects your home from water damage or scratches. Start by turning off power at the circuit breaker, not just the light switch, to eliminate any risk of electrical shock. This critical safety step should never be skipped, even for quick dusting sessions.
Next, spread drop cloths and painter’s tape on floors and secure coverings around the chandelier area. These protective measures catch falling drips and prevent cleaning solution from staining carpets or hardwood. Position your ladder on a stable, level surface and wrap soft towels around the top to prevent scratches on walls or ceiling trim.
Set up additional lighting in the room so you can see every crystal clearly. Good visibility helps you spot dirt, inspect for damage, and work more efficiently. Open windows or turn on fans to improve ventilation, especially if you are using any cleaning solutions with mild fumes.
Remove furniture from directly beneath the chandelier to create a clear working zone. This prevents accidental bumps and gives you room to move safely around your ladder. Clear the area of any decorative items, plants, or electronics that could be damaged by dripping cleaning solution.

Wear clean cotton gloves throughout the entire process. Gloves prevent fingerprints on freshly cleaned crystals and give you better grip when handling delicate prisms. They also protect your hands from cleaning solutions and sharp crystal edges.
Pro Tip: Take photos of your chandelier from multiple angles before you start disassembling any parts. These reference images make reassembly much easier and help you remember the exact placement of each crystal strand or decorative element.
Gather all your supplies before climbing the ladder. Keep microfiber cloths, your chosen cleaner, a small bowl for soaking if needed, and any tools within easy reach. Making multiple trips up and down increases fatigue and accident risk. Once your workspace is properly prepared, you can focus entirely on the best techniques safely cleaning crystal chandeliers without worrying about safety hazards or property damage.
Choosing the right cleaners for crystal chandeliers
Selecting appropriate cleaning products makes the difference between sparkling results and permanent damage. pH-neutral, non-abrasive cleaners are essential because they dissolve dirt without etching crystal surfaces or corroding metal components. These specialized formulas evaporate cleanly, leaving no residue that dulls your chandelier’s shine.
Commercial crystal cleaners designed specifically for chandeliers offer convenience and reliability. They typically contain surfactants that break down grease and dust while maintaining the proper pH balance. Many modern formulas are environmentally friendly, biodegradable, and free from harsh chemicals that could harm your family or pets.
For homeowners who prefer DIY solutions, white distilled vinegar mixed with equal parts water creates an effective crystal cleaner. The clarity and acidity of distilled vinegar cut through grime without leaving streaks or staining residue. However, never apply this mixture directly to metal frames, as the acid can damage brass, bronze, or gold finishes over time.
Whatever cleaner you choose, verify it contains no ammonia, bleach, or abrasive particles. Ammonia-based products can strip protective coatings from metal frames and cause discoloration. Abrasive cleaners create microscopic scratches that trap dirt and make crystals appear cloudy even after cleaning.
Pro Tip: Always test your chosen cleaner on a single crystal or an inconspicuous section of the metal frame first. Wait 24 hours to ensure no discoloration, cloudiness, or finish damage appears before proceeding with the entire chandelier.
Here is a comparison of common cleaning options:
| Cleaner Type | Cost | Effectiveness | Environmental Impact | Best For |
|---|---|---|---|---|
| Commercial spray cleaner | $15-30 per bottle | Excellent on grease and dust | Low if eco-certified | Regular maintenance, busy households |
| Distilled vinegar solution | $3-5 per gallon | Very good on crystals only | Very low, natural product | Budget-conscious, eco-focused homeowners |
| Isopropyl alcohol mix | $5-10 per bottle | Good for light cleaning | Moderate, evaporates quickly | Quick touch-ups between deep cleans |
| Professional-grade formula | $25-50 per bottle | Superior, no residue | Low, concentrated formula | Antique or high-value fixtures |
The spray and drip method works best with cleaners specifically formulated to evaporate without wiping. These products cling to crystal surfaces long enough to dissolve grime, then drip away cleanly. This approach minimizes crystal handling and reduces the risk of breakage or fingerprints.
Store your cleaning products in a cool, dry place away from direct sunlight. Check expiration dates on commercial cleaners, as degraded formulas may leave residue or lose effectiveness. Keep all cleaning solutions out of reach of children and pets, even if they are labeled as environmentally friendly or non-toxic.
Invest in quality microfiber cloths for any necessary wiping. These lint-free fabrics absorb moisture effectively and will not scratch delicate surfaces. Avoid paper towels, which can leave fibers behind and create static that attracts dust. With the right cleaning products selected, you are ready to learn the detailed process for best techniques safely cleaning crystal chandeliers that delivers professional results.
Step-by-step household cleaning checklist for crystal chandeliers
Follow this systematic approach to clean your chandelier safely and effectively. Each step builds on the previous one to ensure thorough cleaning without damage.
-
Confirm power is off by testing the light switch after turning off the circuit breaker. Use a non-contact voltage tester on the fixture itself for absolute certainty before touching any components.
-
Dust the entire chandelier with a soft feather duster or lambswool wand. Regular dusting prevents buildup, especially in homes with pets or high traffic. Work from top to bottom, gently brushing each crystal and metal surface.
-
Inspect all components closely before applying any liquid cleaner. Look for loose crystals, frayed wiring, corroded sockets, or damaged metal finishes. Address any electrical or structural issues before proceeding with wet cleaning.
-
Apply cleaner using the spray and drip method for quick maintenance. Hold your spray bottle 6-8 inches from each crystal and apply a light, even mist. The cleaner should coat the surface completely, then drip down naturally, carrying away dirt and grime.
-
Work methodically in sections to ensure complete coverage. Start at the top tier and move downward, cleaning one arm or section at a time. This systematic approach prevents you from accidentally missing areas or over-spraying the same crystals.
-
Protect metal frames by avoiding direct spray on brass, bronze, or gold-plated components. If cleaner accidentally contacts metal, immediately blot it away with a clean microfiber cloth. For metal cleaning, use a separate product designed specifically for that finish type.
-
Handle crystals with care by supporting each piece from the base when necessary. Never pull or twist crystals, as this can damage the wire loops or pins that hold them in place. Wear your cotton gloves throughout to prevent fingerprints on clean surfaces.
-
Allow adequate drying time before restoring power. Most spray cleaners evaporate within 10-15 minutes, but complex chandeliers with many layers may need 30 minutes to dry completely. Patient waiting prevents water spots and ensures electrical safety.
-
Inspect wiring and connections during reassembly if you removed any components. Look for signs of heat damage, corrosion, or loose connections. Replace any questionable wiring or sockets before turning power back on.
-
Restore power and test the chandelier carefully. Turn on the circuit breaker first, then use the light switch. Check that all bulbs illuminate properly and listen for any unusual buzzing or clicking sounds that might indicate electrical problems.
-
Document your cleaning date in a home maintenance log or calendar. Recommended cleaning schedules suggest light dusting every 2-3 months and full cleaning every 6-12 months, depending on your home environment.
-
Adjust your schedule based on specific factors in your home. Homes near busy roads, with smokers, or in humid climates may need more frequent cleaning. Conversely, climate-controlled homes with minimal cooking or pets can extend time between deep cleans.
This methodical checklist ensures you clean every part of your chandelier safely while protecting both the fixture and your home. The spray and drip technique minimizes handling, reducing breakage risk and saving time compared to traditional hand-wiping methods. By following these best techniques safely cleaning crystal chandeliers, you maintain your fixture’s brilliance without professional help or expensive service calls.
Maintain your chandelier’s shine with expert cleaning solutions
Implementing this checklist becomes even easier with products specifically designed for crystal chandelier care. Brilliante Crystal Cleaner offers a professionally formulated spray solution that works perfectly with the spray and drip method you just learned. This environmentally friendly, non-abrasive formula is made in the USA and rated number one by hundreds of satisfied homeowners.

The drip-dry technology eliminates wiping, which means less handling and virtually no risk of breaking delicate crystals. The pH-neutral formula cleans thoroughly without leaving residue or tarnishing metal frames. You simply spray and walk away, letting the solution do the work while it evaporates cleanly. This approach saves time and delivers professional results that keep your chandelier sparkling between deep cleaning sessions. Homeowners who invest in quality cleaning products extend the time between full cleanings while maintaining that showroom brilliance year round.
FAQ
How often should I clean my crystal chandelier?
Dust your chandelier lightly every 2-3 months using a soft feather duster or lambswool wand to prevent buildup. Perform a full cleaning every 6-12 months depending on your home environment. Homes with pets, smokers, or high cooking activity need more frequent attention, while climate-controlled spaces with minimal dust can extend cleaning intervals. Regular light maintenance prevents heavy grime accumulation that requires aggressive cleaning methods.
Can I use vinegar to clean my chandelier without damaging it?
Yes, but only on crystal components using a 1:1 mixture of white distilled vinegar and water. Never apply vinegar directly to metal frames, as the acidity can corrode brass, bronze, or gold-plated finishes over time. For delicate or antique metal work, use a milder solution or stick to cleaners specifically formulated for mixed materials. Always test on an inconspicuous crystal first to ensure your specific fixture tolerates the solution.
What safety precautions should I take when cleaning chandeliers?
Always turn off power at the circuit breaker, not just the wall switch, before starting any cleaning work. Use a stable ladder on level ground and wear cotton gloves to prevent fingerprints and improve grip. Inspect all wiring, sockets, and connections for damage before reassembly, and never restore power until the fixture is completely dry. Keep your workspace clear of obstacles and work slowly to prevent accidents or dropped crystals.
Should I hire a professional to clean antique chandeliers?
Yes, antique or heirloom chandeliers often require professional dry cleaning or specialized care to protect irreplaceable components. Vintage fixtures may have delicate finishes, hand-cut crystals, or outdated wiring that demands expert handling. Professional cleaners have specialized tools, insurance, and experience with historic fixtures that prevent costly damage. For valuable antiques, the investment in professional service protects both monetary and sentimental value while ensuring proper restoration techniques.
What should I do if crystals appear cloudy after cleaning?
Cloudiness usually indicates residue from cleaning products or hard water minerals. Re-clean affected crystals with distilled water or a residue-free commercial cleaner, ensuring complete evaporation before touching. If cloudiness persists, the crystal surface may have etching from previous use of abrasive cleaners or harsh chemicals. Permanent etching cannot be reversed at home and may require professional restoration or crystal replacement. Always use pH-neutral products and soft water to prevent this issue in future cleanings.