
Smart ways to organize under the sink: clutter-free kitchen
TL;DR:
- Organizing under the sink improves accessibility, reduces clutter, and extends product lifespan.
- Measure your space, identify your needs, and choose simple, accessible storage solutions.
- Maintain the system with quick weekly checks, limiting items, and avoiding over-complication.
You reach under the sink for a sponge and out tumbles a half-empty bottle of dish soap, a mystery scrubber, and three duplicate cleaning sprays you forgot you owned. Sound familiar? The under-sink cabinet is one of the most neglected storage zones in any kitchen, yet it’s opened dozens of times a week. When it’s a mess, every small task gets harder. When it’s organized, you save time, reduce waste, and actually know what you have. This guide walks you through a practical, step-by-step approach to turning that chaotic cabinet into a reliable, easy-to-maintain storage system.
Key Takeaways
| Point | Details |
|---|---|
| Clear and assess first | Starting with an empty cabinet and inventory is the foundation for smart under-sink organization. |
| Pick the right tools | Match your organizers—like pull-out drawers—to both your needs and available space for best results. |
| Keep it simple | Simple systems with a few clear zones are easier to maintain and stay clutter-free longer. |
| Maintain regularly | A quick weekly check and tidy is more effective than seasonal overhauls for keeping your space neat. |
Assessing and preparing your under-sink space
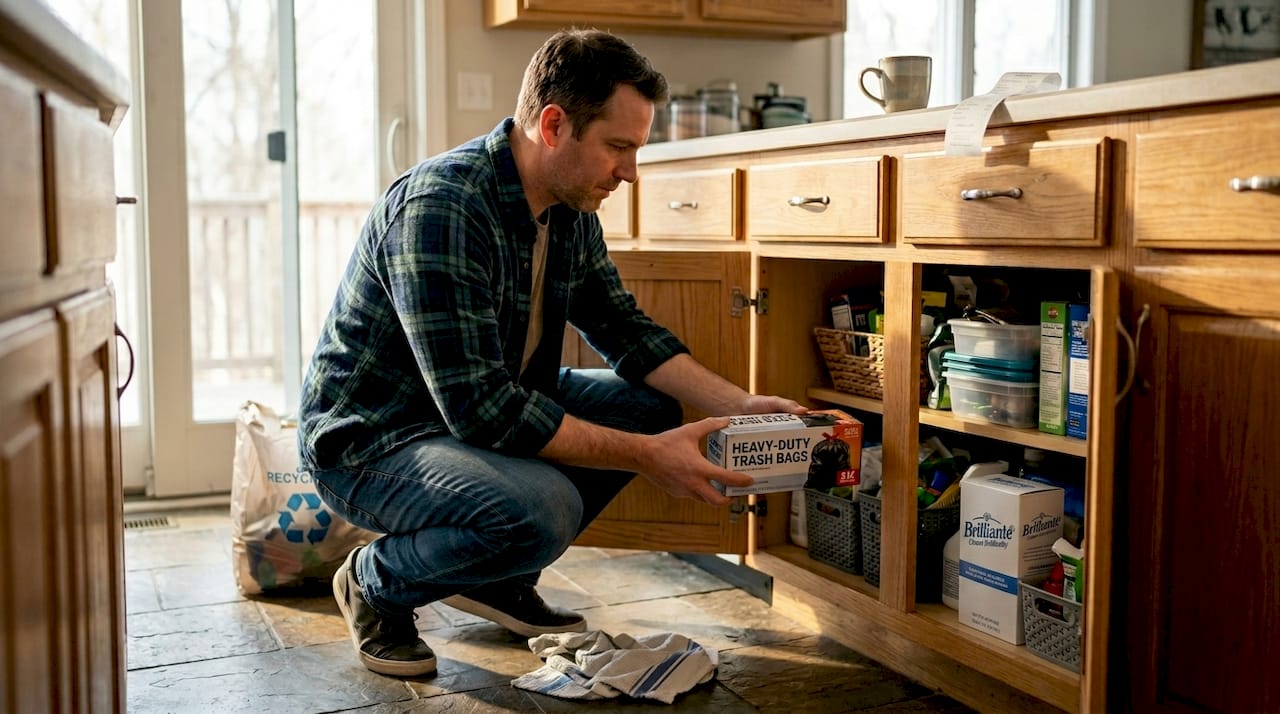
Before you buy a single bin or drawer, you need to know exactly what you’re working with. Pull everything out from under the sink and set it on the floor or counter. Yes, everything. This step feels tedious, but it’s the only way to see the full picture of what you’ve been storing, what’s expired, and what can simply be tossed.
Once the cabinet is empty, inspect it carefully. Most under-sink spaces come with a few built-in challenges:
- Pipes and plumbing that take up central space and limit shelf placement
- A garbage disposal unit that eats into usable floor space
- Deep cabinet walls that make rear items nearly impossible to reach
- Moisture or minor leaks that can damage products or create mold over time
If you spot any moisture, address it before organizing. A small drip left unchecked will ruin your new system fast.
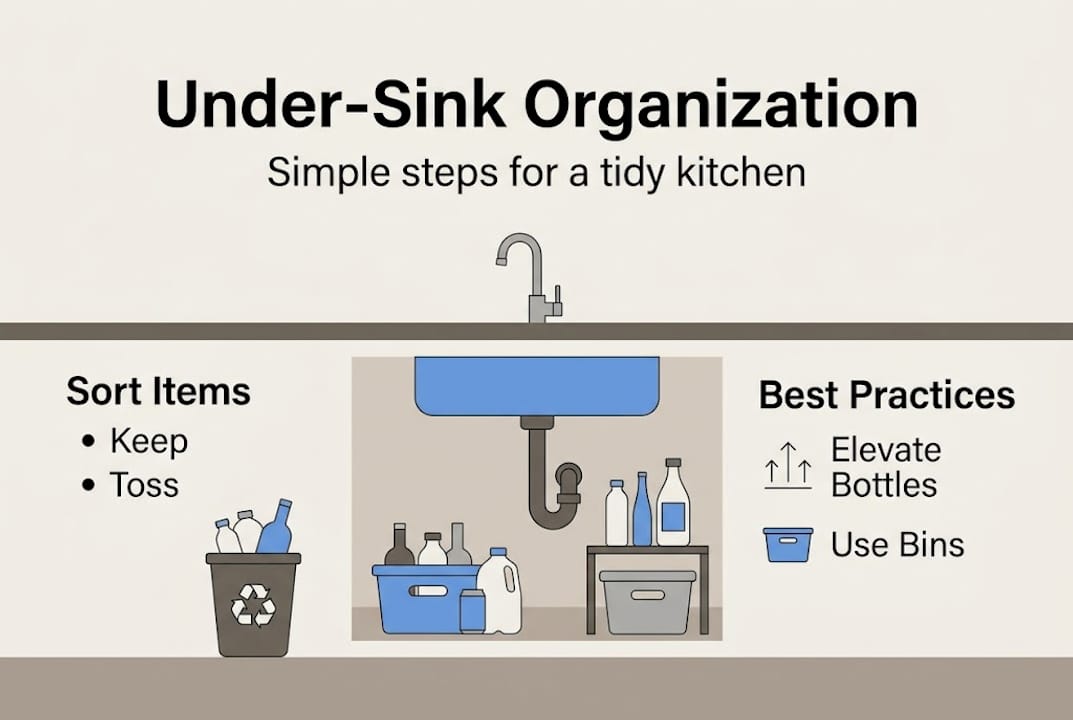
Now look at what came out of the cabinet. Sort items into three piles: keep, toss, and relocate. Expired cleaners, dried-out sponges, and products you haven’t touched in a year belong in the trash. Items that don’t logically belong under the sink (like batteries or light bulbs) should find a better home.
| Item type | Keep | Toss | Relocate |
|---|---|---|---|
| Daily-use cleaners | Yes | If expired | No |
| Duplicate bottles | 1 per type | Extras | No |
| Sponges and scrubbers | Fresh ones | Old/worn | No |
| Trash bags | Yes | No | No |
| Non-kitchen items | No | Maybe | Yes |
Pro Tip: Before heading to the store for organizers, take a quick inventory of what you’re keeping and measure your cabinet’s interior. Buying supplies before this step is one of the most common (and costly) mistakes homeowners make.
As a rule, place frequently used items front and center, with backups stored in the rear or higher up, and limit yourself to one or two bottles per product type to avoid overflow. This principle alone will cut your clutter in half. If you’ve already worked on organizing laundry zones in your home, you’ll recognize this same logic at work.
Choosing the right organizers and storage solutions
Once you know your space and needs, it’s time to select storage solutions that streamline your daily routine. Not all organizers work equally well under a sink, and the plumbing layout will heavily influence your choices.
Start by measuring the interior width, depth, and height of your cabinet. Note where the pipes run so you can plan around them. Then compare your options:
| Organizer type | Best for | Watch out for |
|---|---|---|
| Pull-out drawers | Daily-use items, easy access | Needs clearance around pipes |
| Tension rods | Hanging spray bottles | Weight limits, bottle size |
| Stackable bins | Grouping similar items | Can reduce vertical reach |
| Door-mounted racks | Sponges, small bottles | Door weight and hinge strain |
| Lazy Susans | Corner or deep cabinets | Works best in wider spaces |
Pull-out drawers for easy access are favored by pros like Martha Stewart, and for good reason: they bring everything to you instead of forcing you to dig. The caution here is to avoid over-organizing with too many labels and bins, which tends to fail in real-world maintenance. Complexity is the enemy of consistency.
Here’s a simple numbered process to select and set up your organizers:
- Measure your cabinet interior (width, depth, height) before shopping.
- Identify your pipe layout and mark off any no-go zones.
- Decide which items need daily access versus occasional access.
- Choose one primary organizer type (pull-out drawer or bin system) rather than mixing too many styles.
- Add secondary solutions (tension rod, door rack) only if they solve a specific problem.
- Test placement before securing anything permanently.
For additional cabinet storage recommendations that apply across your kitchen, it helps to think about the whole room as a system rather than solving one cabinet at a time. Prioritize accessibility first. If something is hard to reach, it won’t get put back properly, and the clutter cycle starts again.
Step-by-step: Setting up your under-sink organization
With your organizers ready, now put your plan into action for a satisfying before-and-after under the sink. The key is working in a logical sequence rather than just placing items randomly.
Start by grouping everything you’re keeping into categories:
- Daily cleaners: dish soap, surface spray, glass cleaner
- Scrubbing tools: sponges, brushes, scrubbers
- Trash supplies: bags, twist ties, odor tabs
- Backups and refills: extra bottles, replacement sponges
Now follow these steps to go from empty cabinet to organized system:
- Place your primary organizer (pull-out drawer or main bin) in the most accessible spot, avoiding pipes.
- Load daily-use items into the front zone so they’re the first thing you see and reach.
- Move backup items to the rear section or a higher shelf if your cabinet allows it.
- Use a tension rod across the middle of the cabinet to hang spray bottles upside down, freeing up floor space.
- Add a door-mounted rack for sponges or small scrubbers if your door can handle the weight.
- Place a small drip tray or liner on the cabinet floor to catch any moisture or spills.
- Do a final reach test: open the door and grab your most-used item. If it takes more than two seconds, rearrange.
Pro Tip: Use clear bins or baskets for grouping items. When you can see everything at a glance, nothing gets lost or forgotten at the back.
For hard-to-reach corners, a small Lazy Susan or a slide-out tray works well. The goal is that front and center placement for your most-used items keeps the system functional day after day. If you’ve applied zone-based organizing elsewhere in your home, this step will feel natural.
Maintaining organization and avoiding common pitfalls
After your system is set, the final challenge is keeping it orderly over time. Here’s how to make it easy and lasting.
Most under-sink systems fall apart for one reason: they were designed for an ideal version of the household, not the real one. Someone buys a product that doesn’t fit the usual routine, sets it in the wrong spot, and the whole system slowly unravels. Within weeks, it looks exactly like it did before.
The biggest trap is over-organizing. Too many bins or labels can actually make maintenance harder, not easier. When a system has too many rules, people stop following them. Keep it simple enough that anyone in the household can put something back correctly without thinking.
“Simple beats complex when it comes to sustainable organization.”
Here are the habits that keep under-sink spaces tidy long term:
- Do a 60-second scan weekly. Look for anything out of place, empty bottles, or items that snuck in from elsewhere.
- Toss empties immediately. Don’t set an empty bottle back under the sink with the intention of recycling it later.
- Replenish before you run out. When a backup bottle moves to the front, add the replacement to your shopping list right away.
- Limit new additions. Before adding a new product, ask whether it truly belongs under the sink or if it’s just convenient.
- Check for moisture monthly. A quick look at the cabinet floor can catch a slow drip before it becomes a real problem.
Avoiding organizing mistakes is as important as the setup itself. The best system is the one that’s easy enough to maintain without effort.
Why simple systems work best: Our under-sink philosophy
Here’s something most organization guides won’t tell you: the fanciest setup is rarely the most functional one. We’ve seen homeowners invest in elaborate multi-bin systems with color-coded labels, custom drawer inserts, and matching containers for every single item. Six months later? It looks worse than before they started.
The reason is straightforward. Elaborate systems demand consistent effort to maintain. Real life doesn’t cooperate. You’re tired after dinner, you grab what you need, and you put it back wherever is closest. A system that punishes that behavior will always fail.
What actually works long term is a minimal setup built around your real habits, not your ideal ones. Two or three zones. Clear containers. Items placed where you naturally reach. That’s it. The systematic organizing tips that hold up over time are always the ones that require the least decision-making in the moment.
Pro Tip: A quick 2-minute tidy each week beats a seasonal overhaul every time. Build it into a routine you already have, like wiping down the counter after dishes, and it becomes effortless.
Elevate the rest of your kitchen organization
Taking control under your sink is just the start. Once you feel the difference that a well-organized cabinet makes in your daily routine, it’s hard not to want that same clarity everywhere else in your kitchen.
At Brilliante, we believe a well-kept home starts with simple, effective systems in every corner, from kitchen cabinets to sparkling chandeliers. Our more organization solutions and resources are built for homeowners who want practical results without the overwhelm. Whether you’re tackling another cluttered cabinet or looking for an easier way to maintain the rest of your home, we’ve got tips and products that make the job faster and more satisfying. Explore what’s possible when every part of your home works as well as your newly organized sink cabinet.
Frequently asked questions
What should not be stored under the kitchen sink?
Avoid keeping food, pet food, or electronics under the sink, as leaks and humidity can cause damage to these items.
How do I prevent under-sink clutter from returning?
Limit yourself to one to two bottles per product type, keep most-used items at the front, and check for duplicates once a month to stay on top of buildup.
Are pull-out drawers better than bins for under the sink?
Pull-out drawers are expert-recommended for easy access, while relying on too many bins or labels tends to complicate upkeep over time.
How often should I reorganize under the sink?
A quick tidy every week is far more effective than infrequent, major reorganizations for keeping the space orderly and clutter-free.